January 24, 2013

Sweet Valentine

Happy Thursday!

Today starts a new challenge over on the My Creative Time blog. This weeks challenge is Liz's challenge and she has decided on a "1, 2, 3 Challenge"  ~  use 1 bow, 2 pattern papers, and 3 buttons.  Can be a card or layout, using any of Emma's stamps or dies.  

Here my card!
5-5
Isn't my piggy cute!?! 
The card was cut at 5"tall and it can be found on the Cricut, Wild card cartridge. My pig is from Lettering Delights and he was cut at 3.5"tall. 
6-6
Paper: PaperTrey Ink, Coredinations, Carte Bella
Card Base: Cricut, Wild Card
Pig Svg: Lettering Delights, Hogs and Kisses
Pig Face: Peachy Keen Stamps, PK-755 Critter Faces SET A Large
Tag Die & Sentiment: My Creative Time, Teeny Tag Greetings Stamp Set
Buttons: My stash
Valentine Twine: Etsy 

Head on over and check out the rest of the designer's projects.DesignerChallengeBanner

I hope you have a wonderful day!

January 23, 2013

For You...

Happy Wednesday!

I have another shaped card, made with another freebie today. I am loving all these cute freebies, that several of the svg sites have started giving away on a daily basis.
 22-22
The card base is from the Artiste Cricut cart. That is my favorite cart for base shapes right now.  I welded it together at the top. The card measures 5.5 tall and 4.25 wide. The bear was cut at 4.25"tall.
21-21
I think he is so cute! I am loving the new teddy bear face assortment set from PKS too!
20-20
Papers: PaperTrey Ink, Core'dinations, My Mind Eye
Card Base: Cricut, Artiste Cart
Bear SVG: Miss Kate Cuttables, Bear in Present 
Bear Face: Peachy Keen Stamps, PK-170 Teddy Bear Assortment
Die Banner & Sentiment: My Creative Time, Chocolate Greetings Stamp Set
Twine: Trendy Twine

Tomorrow starts another Designer Challenge on the My Creative Time blog. I can wait to show you my project.

I hope you have a wonderful day!

January 22, 2013

Hugs & Kisses!

Happy Tuesday!

I have another shaped card for you today. I have been wanting to use this card base for awhile now, I just had to find that perfect cut that work with it.
 Don't you just love my little monkey? I lub her! 

The card base was sized at 4.25"wide x 8.5"tall. The inset measures 3.9"x 3.9" and the inset circle measures 3.5" in dia. I cut the monkey at 3.25" tall.
Paper: PaperTrey Ink, We R Memory Keepers, and Core'dinations
Card Shape: Cricut, Artiste Cartridge
Banner Die: My Creative Time, Chocolate Greetings Stamp Set
Sentiment; My Creative Time, Chocolate Greetings Stamp Set
Twine: Trendy Twine, Watermelon Taffy

I hope you have a wonderful day!

January 21, 2013

Lovebug Kitty and a Freebie!

Happy Monday!

I have another fun Hello Kitty freebie for you today!
 The base of the card (oval) measures 4" x 4 3/4". The kitty was cut at 3 3/4"tall.
Papers: PaperTrey Ink, Bo Bunny, and Core'dinations
Hello Kitty SVG: Freebie (See below)
Twine: Trendy Twine

Free File!
A few things before you download... 
1st : Please become a follower of my blog, if not already.
2nd:  Also, if you use the file and post it online, please link back to my blog.
3rd: Hello Kitty is a registered trade mark of the Sanio Company. This file can not be used for profit.  

I made it into three versions .mtc, .svg, or .studio, so be sure to click the one you want/need.

**If you are looking for last weeks give-away winners, I ran out of time and didn't get them posted. They will be announced in tomorrow's post.**

I hope you have a wonderful day!

January 18, 2013

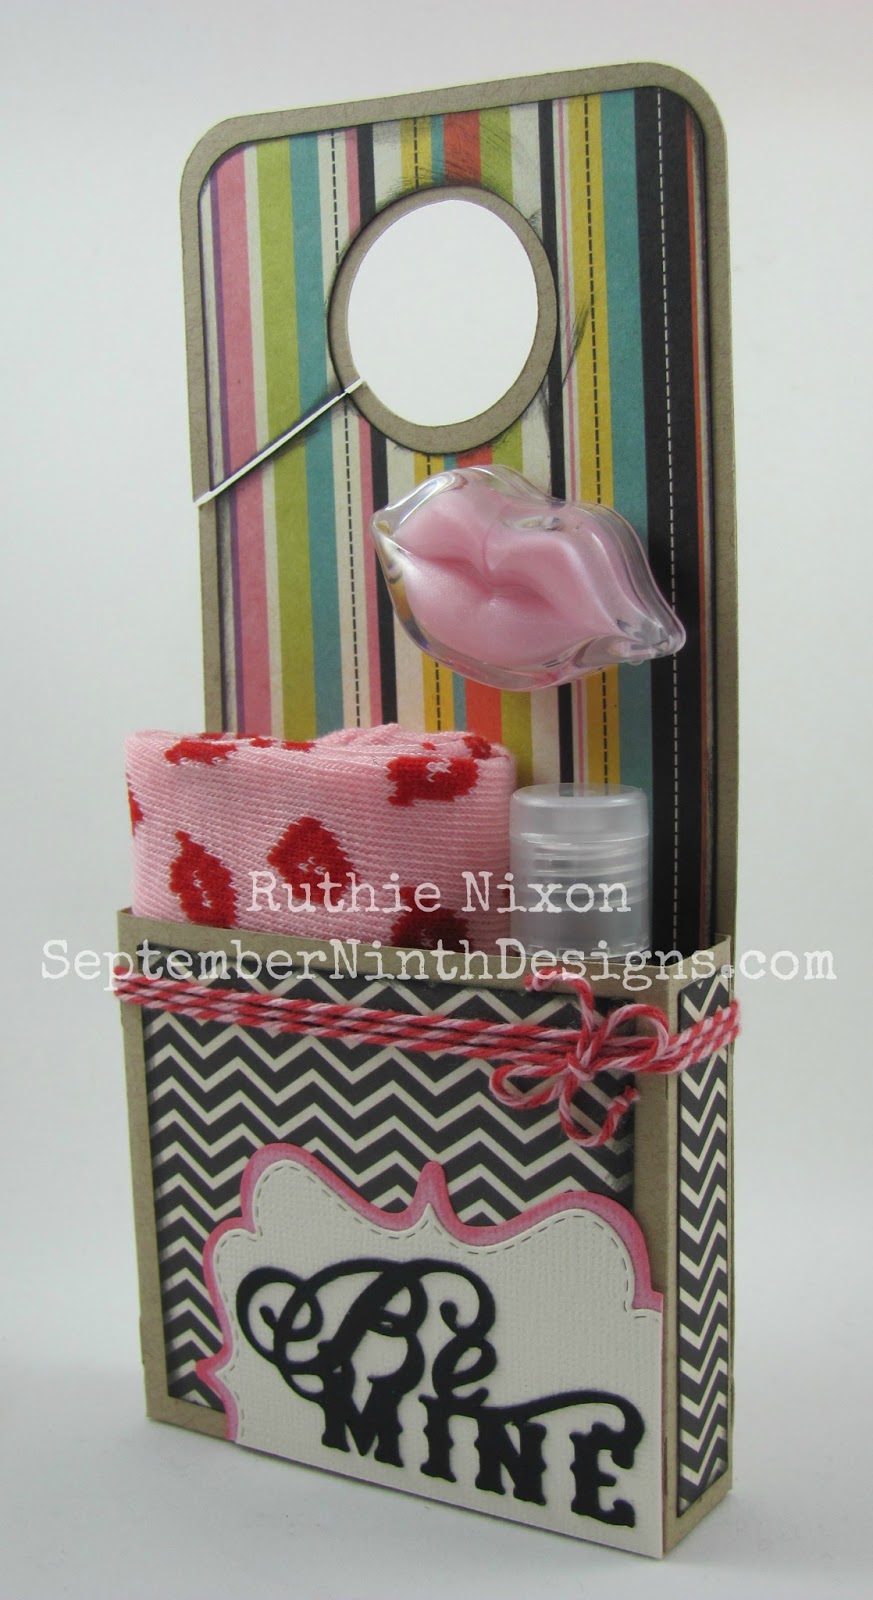
Be Mine Door Hanger

Happy Friday!

Hey paper lovers! Today is day five and my last day, as guest designer, on the Obsessed with Scrapbooking blog!  I have had so much fun this week, sharing my Valentine treat idea's with you. I hope you were inspired! It's been an honor to have been asked to do this and I want to thank Joy, for the wonderful opportunity.

Today's project is a door hanger treat.
I designed everything on my Gypsy. I sized the door hanger to 11 1/4" tall and the inset (patterned) piece was sized at 10 1/4" tall. I only used the back potion, so I placed it on the mat so that the back potion was the only part on the mat, hence it was the only part that cut out. I also hid the circle and replaced it with a circle at was 1 1/4", it needs to be larger. I also sized one square, from George Basic Shapes, at 3"x 2 3/4" (front piece) and two at .625"x 2 3/4" (side pieces). The "Be Mine" was sized to 2 1/2"x 1 1/4 and cut out. Lastly, the XL label dies were cut out, everything was inked, assembled, the twine wrapped around the pocket.
I filled the pocket with goodies from the $1 stop at Target and some hand lotion from Bath and Body Works. I attached the lips, lip gloss with a glue dot. I didn't want it to get lost in the pocket.
Door hanger: Cricut, Art Philosophy Cartridge
Be Mine: Cricut, Artiste Cartridge
XL Label Dies: My Creative Time, Stitched XL Label Die & XL Label Die
Papers: PaperTrey Ink, Core'Dinations, and We R Memory Keepers
Twine: Trendy Twine, Valentine Cherry Cupcake
Socks & Lip Gloss: Target, $1 Spot
Lotion: Bath and Body Works

**Giveaway**

So I thought it would be fun to have a giveaway each day too! Today's giveaway is my favorite precision tip craft tweezers.

For a chance to win, all you have to do is leave a comment here and on the Obsessed with Scrapbooking  blog, make sure to add your contact information!  I will pick the winner, via random.org, this Sunday, January 20th and all the winners will be announced on here on my blog, Monday morning, January 21st.

Thanks so much for hanging in with me this week!
I hope you have a wonderful weekend!

January 17, 2013

Heart Candy Treat

Happy Thursday!

Hey paper lovers! Today is day four of my guest week on the Obsessed with Scrapbooking  blog and I can't believe it's almost over! I have another fun Valentine's treat for you today.
 This little treat envelope holds just the right amount of M&M's for a small gift. Overall the envelope measures 4 x 3 3/4" tall. 
I sized the envelope on my mat, on my Gypsy, to 6"wide. I then sized the heart to 3 1/2", centered it on the front of the envelope, and joined them together. I then took two more hearts, sized one at 3 3/4"and one at 3 1/4", then I placed the smaller one inside the larger and joined them together. This creates the framed heart shape. After everything is cut out, ink the edge of the heart, wrap the twine around the edge of the heart, make the sentiment tag and glue it to the heart right under the bow, then apply the heart to the front of the envelope with foam tape. Lastly, I placed about 1/4cup of M&M's in the plastic bag, cut the height down to 4", and sealed it. I  put the envelope together (on three sides) with score tape, added the bag of M & M's, and closed the top. 
Envelope: Cricut, Wild Card 2
Heart: Cricut, Wild Card 2
Paper: Core'dinations & We R Memory Keepers
Twine: Trendy Twine, Watermelon Taffy
Sentiment: My Creative Time, 100% Sweetness Stamp Set
M&M's: Target
Plastic Treat Bags: Michael's

**Giveaway**

So I thought it would be fun to have a giveaway each day too! Today's giveaway is a sampler  of Trendy Twine's Watermelon Taffy pack.

For a chance to win, all you have to do is leave a comment here and on the Obsessed with Scrapbooking  blog, make sure to add your contact information!  I will pick the winner, via random.org, this Sunday, January 20th and all the winners will be announced on here on my blog, Monday morning, January 21st.

See you back here tomorrow!
I hope you have a wonderful day! 

January 16, 2013

Heart Earrings

Happy Wednesday!

Hey paper lovers! Can you believe that we are half way there? Today is day three, of my guest week fabulous Obsessed with Scrapbooking blog! I have another fun Valentine's treat for you today.

Who doesn't love some fun and festive ear decor?
 The heart's were cut from the Wild Card cartridge. I sized them on my Gypsy at 1 1/2" tall each. After cutting them out (blade 6, max pressure, cut 2x), I stamped them with red Satzon Ink, punched a hole at the top with my Crop-o-dile, and used my heat gun to shrink them down to size. 
Fun right?

Here is a more in depth video tutorial showing how to make the earrings. Start the video at 4:00 minutes, to skip through the design software tutorial, to see how the earrings are made. 
You can also color the hearts in with Copic markers or Parisma colored pencils.
Heart: Cricut, Wild Card 2
Shrinky Dinks: Michael's
Ear Wires: Michael's
Back Ground Stamp: My Creative Time, Coffee Backgrounds Stamp Set
Red Ink: Stazon Ink: Michael's
Paper: PaperTrey Ink, Kraft & Carta Bella, Devoted
Stamp Die: My Creative Time, Stitched Postage Frame Die
Sentiment: My Creative Time, 100% Sweetness Stamp Set
Twine: Trendy Twine, Valentine Cherry Cupcake

**Giveaway**

So I thought it would be fun to have a giveaway each day too! Today's giveaway is a Unity bow maker!
For a chance to win, all you have to do is leave a comment here and on the Obsessed with Scrapbooking  blog, make sure to add your contact information!  I will pick the winner, via random.org, this Sunday, January 20th and all the winners will be announced on here on my blog, Monday morning, January 21st.

See you back here tomorrow!
I hope you have a wonderful day! 

January 15, 2013

Pretzel Treat Bags

Happy Tuesday!

Hey paper lovers! It's day two of my guest spot over at the Obsessed with Scrapbooking blog.

Today's treat is chocolate dipped pretzels, in a bag, with a cute topper. 
Hand dipping and decorating pretzels, are just about as fun to make as they are to receive. I love all the fun holiday sprinkles that can be found at the store. You can find the chocolate buttons, in different colors, at Michael's and Joann's. 
I used my Gypsy to design the topper. I opened and sized the scalloped square, from Mini Monograms, to 3" x 3" wide. I found a square on George Basic shapes and sized it to 2.25" x 2.25". Once they were cut out, I inked the edges, glued them together, and folded them in half and adhere them, with Scor tape, to the tops of the pretzel bags. Lastly, I cut the heart dies, the banner dies, stamped the banners, and attached everything to the front, with foam tape.
Scallop Topper: Cricut, Mini Monograms
Square: Cricut, George Basic Shapes
Heart Die: My Creative Time, 100% Sweetness Stamp Set                     
Banner/Flag Die & Sentiment: My Creative Time, Chocolate Greetings Stamp Set
Papers: Echo Park
Pretzels: Target
Pretzel bags: Michael's
Chocolate & Sprinkles: Joanns & Target

**Giveaway**

So I thought it would be fun to have a giveaway each day too! Today's giveaway is my favorite crafting tool, needle nose glue applicator. It fits perfectly on the top of a bottle of Scotch Quick Dry Glue.
For a chance to win, all you have to do is leave a comment here and on the Obsessed with Scrapbooking  blog, make sure to add your contact information!  I will pick the winner, via random.org, this Sunday, January 20th and all the winners will be announced on here on my blog, Monday morning, January 21st.

See you back here tomorrow!
I hope you have a wonderful day! 

January 14, 2013

Candy Flower Treats

Happy Monday!

 I am so excited because Joy over at Obsessed with Scrapbooking has asked me to be the guest designer on her blog this week! I am so thankful for this amazing opportunity!

Since Valentine's Day is exactly a month away, I thought it would be fun to spend the week sharing some fun Valentine's treat ideas. Today's treat is cute, inexpensive, and a perfect craft that kids can help make.
How fun are these lollipop treats?
 I used my Gypsy to open and size the flower, from the Artiste cart, to 2.25" tall and I hid the circle in the center of the flower. I opened a circle from George Basic Shapes and sized it to .30", placed it in the center of the flower, and then grouped them together. After grouped, I copied and pasted as many flowers as I needed to the mat, so that I could cut them out all at once. 

Once all my flowers were cut out, I inked the edges, stamped them in the center with the sentiment, and slipped the lollipop through the center.  You could also cut a small leaf and add that as well. That would be a perfect place to add a classmates name.
Flower: Cricut, Artiste Cartridge
Circle: Cricut, George Basic Shapes
Dum-Dums Lolli's: Dollar Tree
Paper: K and Company
All Around Sentiment: My Creative Time, Classmate Valentines
Pink Tulle Ribbon: Michael's
 Pot: Michael's 

**Giveaway**

So I thought it would be fun to have a giveaway each day too! Today's giveaway is the My Creative Time stamp set that I used on my project!

All you have to do is leave a comment here and on the Obsessed with Scrapbooking  blog, make sure to add your contact information!  I will pick the winner, via random.org, this Sunday, January 20th and all the winners will be announced on here on my blog, Monday morning, January 21st.

See you back here tomorrow!
I hope you have a wonderful day! 

January 11, 2013

Welcome Baby

Happy Friday!

Whew! So glad that it is Friday! 
I made a card for a friend who is about to have a baby. It's a girl and I am so excited for them. Her nursery is yellow and pink, so I tried to stay with those colors.
I made the card base in Make-the-Cut with basic shapes. I am sharing it below. It measures 5.5" wide x 6.8" tall. The elephant was sized at 2" tall. I replaced the heart in the svg file with the medium stitched heart layering die. It end up being about the right size and I like the stitched effect.
Paper: PaperTrey Ink & Echo Park
Elephant SVG: Lettering Delights, Sweet Nothings
Scalloped Card Base: Designed in MTC with basic shapes, Freebie (see below)
Heart Die: My Creative Time, Stitched Heart Layering Dies
Banner Die: My Creative Time, Chocolate Greetings Stamp Set
Sentiment: My Creative Time, Chocolate Greetings Stamp Set
Twine: Trendy Twine, Water Mellon Taffy

Free File!
A few things before you download... 
1st : Please become a follower of my blog, if not already.
2nd:  Also, if you use the file and post it online, please link back to my blog.

I made it into two versions .mtc and .svg.

I hope you have a great day and a wonderful weekend!