September 30, 2010

*Giveaway Closed* Peachy Keen Stamps "September Release" Blog Hop!

Happy Thursday!

Today is the Peachy Keen "September Release" Blog Hop! If you have arrived here from Emma's blog, then you are on the right track, but if not, then please be sure to go back to Peachy Keen's Blog and start hopping from there! Believe me, you don't want to miss a thing!

There are six new sets of stamps being released today! My project was made with set #5, PK-500 Snow Cutie Face Assortment.   
 The project that I made is a mini album ornament. Every year, right after Thanksgiving,  I get together with a group of friends and we exchange ornaments. It's sort of a new tradition for us, this year will be our 4th year. The very first year that we planned to do the exchange, I decided that I wanted something more interactive, so this is what I came up with. Each year I make a different shaped album, each album has photo's of that specific family inside. This year's album is a Gingerbread Man. 
 My little gingerbread man was purchased from My Scrap Chick and cut out with Make-the-Cut and my Cricut. He is 4" tall. I used Papertrey Ink kraft card stock for his body, and DCWV card stock for his hat, heart, and scarf. His sweet little face was stamped with the 1" stamp.  The album can hold 6 small photos.  I made this album for my brother and sister-in-law, they had a baby this year and I thought it would be fun to make a "baby's 1st" ornament and fill it with pictures of Zachary's 1st year. 
Here is what it looks like hanging up! Just envision that knob as a tree branch. :)
 The best part of today's blog hop is that each blog is giving away one of the new release stamp sets! I will be giving away the PK-500 Snow Cutie Face Assortment! All you have to do to be entered to win is:

1. Become a follower (if not already)  
2. Leave me a comment on this post. (one comment per person please)

You will have until Monday October 4th at 5pm (PST) to leave a comment. I will use Random.org to choose the winner and make the announcement on Tuesday morning.

Make sure that you stop at every blog and leave a comment! That means that you will have 15 chances to win a set of PK stamps! Below is a list, in order, of all the blogs in the hop.


The next stop in the hop is Sonia's blog, click the button below to get to her blog!

Thanks so much for "hopping" along with us today! I hope you have a wonderful day!

Check back tomorrow for the start of Peachy Keen's, "Let's Face it Friday's" Challenge #2!


September 29, 2010

Peachy Keen September Release - Day 4!

I hope your having a wonderful day/evening! 

Here is a small sneak peek of one of the new Peachy Keen September releases!
Thursday, this week, we will be having a Blog Hop to celebrate the new releases! Each of the Peachy Keen design team members will be unveiling their "sneak peek" and there will be lots of fun prizes! 

Hope to see you there! :)

September 28, 2010

Boo... too you!


Happy Wednesday!

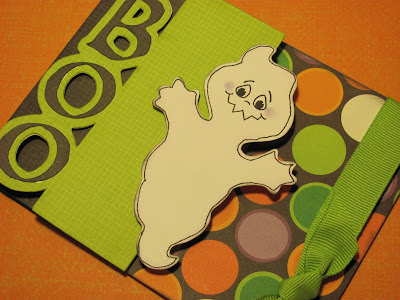
Today's card, is for this weeks challenge over at the Cricut Cards Challenge blog. This weeks  challenge was to make a S or Z fold card for Halloween, using any carts and colors that you would like. 

This is my card...
I used paper from the K and Company paper stack, Spook*Tacular and 5/8" grosgrain ribbon from Michael's. I designed the card in Make-the-Cut  and then cut the ghost from the  Everyday Paper Dolls cart, he was cut at 3 3/4". The face on the ghost is from the Monster Mash Face Assortment from Peachy Keen Stamps. 
I hope you have a "Bootiful" day!

Check back later today for a "Sneak Peek" of Peachy Keen Stamps new September releases!


Pumpkin Fun

Happy Tuesday!

I was able to get in some "creative paper" time last night and I was able to convert a few images from a new graphic set that I bought from Little Dreamer Designs. The set was designed by Nancy Kubo, the same Nancy Kubo that designed the Create A Critter cart. I have a few of her sets and I am really excited about this one! I used Make-the-Cut and my Cricut to cut the shapes out. I changed the design of the pumpkins up a little, so that I could use my Peachy Keen Jack-O-Lantern Face Assortment for the faces on the pumpkins.
 and you know me...the inside of the card has to look as good as the front. :)
I found some really cool gelly roll pens at Michael's yesterday! They are called Glaze. They have a 3-d glossy ink and they come in 10 vibrant colors. I used a coupon and was able to get them for $13.10 (including tax), but you can also get them from here.  I LOVE how smooth they write and that they have the same effect as Glossy Accents, but in one simple step! The ink does take a little while to dry, but the effect you get is totally worth it! I used the yellow and opaque pens on their faces.
Trust me...it looks so much better in real life!

 Don't forget to check back tomorrow...I will have a sneak peek of one of Peachy Keen's new stamp releases for September! 

I hope you have a wonderful day!


September 21, 2010

FAll Blog Hop Winners!

Happy Tuesday!

Sorry that I was MIA yesterday! I had the best of intentions and never got a chance to sit down at the computer long enough, to write up a post.

First of all, I wanted to thank everyone who took the time to "hop"  in the blog hop! We had so much fun putting our projects together and we were all so excited that everyone enjoyed it! 

We are definitely planning on having another "hop" in a month or so,  for the winter Holiday's! 

Anyway... on to the winners!

I used Random.org to select the two winners and they are:
 
 Christy Cocker and Stacey Ash

Congrats ladies! If you haven't already, please send me your address.

Again, I want to thank everyone who took the time to "hop" with us! We had a blast and we hope you did too! :)

I should have a card and a video up tomrrow!
Have a great day!


September 18, 2010

Fall Blog Hop! **Giveaway Closed**

Good Morning!

Thanks so much for "hopping" along with us today! We are so excited to share our 
"fall" themed projects with you!  

I can't wait to "hop" right along with you and see all the cool projects that these 8 super talented ladies have made!
You will have a chance to win blog candy at each stop! So... make sure you leave a comment on each blog! The winners will be picked at 6pm tomorrow (Sunday) night and they will be announced, on Monday morning.

Here is the HOP order. Just in case you get lost along the way, each blog will have this same list. :)

Ready? Let's go!

SeptermberNinth (You are here)
Kim 
 Chris 

Remember, if you get lost along the way, just look for the list and you can get back on track!

So lets get on to the craftiness... shall we? 

I am going to show you how to make the most adorable pumpkins! They are very inexpensive to make and super quick and easy!  Oh yeah... and fun too!
So here is what you are going to need to make these pumpkins! 
You'll never believe what's inside! 
 1. Raffia - Purchased at Joanns for $1
2. Fat Quarters - purchased at Joanns for $2 eac.
3. Fall leaves - purchased at Joanns for $1
4. Lunch size paper bags 
5. Toilet paper - purchased at the $1 store
6. Light weight batting - purchased at Joanns

You are also going to need:
Scissors
Hot glue gun and glue sticks
Step #1 ~Take the batting and cut it into a square, it needs to be big enough so that you will be able to tuck the batting into the top of the toilet paper roll.  Like this...
Step #2 ~ Take the fat quarter and lay it underneath the batting & toilet paper,
just like in step #1. Then tuck the fabric into the center of the roll, just like the batting.
 This is what it should look like when you are finished.
WooHoo! Almost looks like a pumpkin!
Step #3 ~Now take a paper bag and start to roll it, like this...
Step #4 ~ when you get it rolled all the way, grab the hot glue and glue the end.
 
Step #5 ~ Once it is finished drying, grab 4-5 strands of raffia.
Step #6 ~Then glue the end of the raffia to the end of the rolled up paper bag.
Like this...
 Step #7 ~ When that is dry, wrap the raffia around the rolled up paper bag.
Like this...
It's always good to have a friend standing by... just in case you need some help!
In this case we had a few friends willing to help! :)
  You will continue to wrap the raffia all the way down, until you get to the end. Then glue the end of the raffia, so that it doesn't unwind.
Step #8 ~ Put glue on the end of the stem, front and back on one end of the stem,
just like above.
Step #9 ~ Then insert the stem into the center of the pumpkin. Hold it in place for a minute or so, until the glue dries. Then you  and tweak it until it is the shape you want.
Step #10 ~Open your bag of leaves and pick out 2 or 3. Then use the glue gun to secure them to the top of the pumpkin, close to the stem.
Step #11 ~ Now take 2 more pieces of raffia, folded in half,
and tie them around the base of the stem
Guess What???? Your finished!
Pretty cute...huh??? 
(The best part... is that if you run out of toilet paper, you can recycle the pumpkin! Ha!)

Here is a video tutorial... just in case you want to see it live! :)

So... on to the blog candy!

I am giving away two, yes two, sets of Peachy Keen Stamps face sets!
and

All you have to do is:
1. Become a follower of my blog, if not already following.
2. Leave me a comment on this post!

I will pick a winner via Random.org on Sunday night and announce the winner on Monday morning, right here!

Thanks so much for "hopping" along with us today!

The next blog on the hop is: The Scrapbooking Queen


September 17, 2010

"Let's Face it Friday" Challenge #1

Happy Friday!

I am so excited! Today is not just any normal Friday... it's Peachy Keen Stamps, very 1st "Let's Face it Friday" challenge!

This first challenge was to create a treat container used for Halloween (or Harvest/Autumn theme) using any of your PK Face Stamps as the focal point of your project.

So... this is what I came up with!
 I made this small treat container out of a piece of 12 x12 black card stock and this Martha Stewart deep edge punch. The "trick or treater's" were cut from the Mini Monsters cart at 
3 1/2". I also used the Doodlecharms cart for the pumpkins and treat bags,  the bat and the spider were cut from the Happy Hauntings cart. The PK stamp sets I used were, the PK-490 Everyday Character Face Assortment and the PK-640 Princess Face Assortment.

Here are a few more close-up images.
I can't wait to see what you come up with!  
Make sure you play along...becasue the prize is better then candy! 
 Prize: 
Cottage Cutz Tear Kitty Die and Face Stamp Set
PK-543 Snow Bitty Faces
Acrylic Round Block R1 (1.75") & R2 (2.5")
 
I hope you have a wonderful day and a great weekend!

September 16, 2010

Sigmund the Seamonster & a Fall Blog Hop!

So while I was making this card, I kept thinking about a Saturday morning T.V. show that I watched when I was little, Sigmund and the Sea Monsters. (I know... I am totally dating myself...) Anyway, I really don't remember much of the show, besides Sigmund.  He was the littlest of the sea monsters and all the other monsters were always making fun of him. Poor little Sigmund. :(

Anyway, my sea monster doesn't look much like Sigmund did, but he is cute nun the less.
The sea monster was cut from the Mini Monsters cart @ 3 3/4". The paper is Doodle Bug Designs, I found the ribbon at Michael's, and the face stamp is from here. The paper punch is a Fiskars boarder punch called Upper Crest.
and you know me... I just have to finish off the inside too! 


and...

Don't forget that this Saturday, September 18th, is the Fall Blog Hop!

There are ten super talented ladies that each have made a
"Fall" project. Make sure you come by and "hop" along with us! It's going to be lots of fun and there will be lots of blog candy! It all starts right here at 8:00am! (eastern standard time)

I hope to see you there!

I hope you have a GREAT day!
Ruthie :)


September 15, 2010

Cricut Cardz Challenege #42

Happy Wednesday!

This is my card for this weeks challenge on the Cricut Cardz Challenge blog.  The challenge was to create a card for Halloween using the "card" feature from any cartridge.

This is my card!
This pumpkin has to be the cutest pumpkin ever!


I used the Mini Monsters cart to cut the pumpkin. I cut him at 5", so that I could use a A2 size envelope. The papers are DCWV and I inked around everything with coordinating inks.

I think it was the fastest Cricut card I ever made!

I hope you have a wonderful day!


Happy Scrap'n!
Ruthie :)